![]()
Taggle IoT Corella + Arduino
- What we're trying to achieve
- What you'll need
- Wiring up the Corella and Atmospheric Sensors
- Getting the Sensor software libraries
- Installing the Corella sketches
- Viewing the MQTT data feed
- Decoding and displaying your data
- Downloads - Board Schematics
- About Taggle Systems
Arduino Setup
Absolute Maximum Ratings
 The revision A Corella module is compatible with 3.3V systems only.
Connection to 5V systems such as Arduino or Beagle Bone will require an interface shield to provide appropriate IO level translation and power supply regulation.
The Corella Arduino Shield is asymmetrical and will only fit properly using the correct orientation.
The Corella should be fitted to the shield as shown with the antenna SMA connector overhanging the edge of the board.

What we're trying to achieve
- Set up a basic, standalone, Temperature/Humidity monitor using an Arduino microcontroller.
- Connect a LPWA (Low Power Wide Area) radio transmitter to send the data via the Taggle Network.
- View the real-time data feed through the Taggle Corella Portal.
- Tap into the Taggle MQTT feed using javascript websockets.
- Display the current Temperature/Humidity on a web page, along with historical graphs.
This document walks you through the steps required to get this all running, but we'll also point out how you can extrapolate -- to set up different sensors, multiple data sources, and to compress your data to save transmissions and power.
Taggle Systems provides the Corella as a great starting point for developing IoT solutions.
What you'll need
You'll need a PC connected to the internet. Or a linux box. Or better still, a mac.
It would be handy if you're familiar with
the Arduino Software (IDE).
And for the front-end reporting, there's a little bit of javascript to deal with.
But I'm sure you can follow the instructions here, step by step - and if nothing
peculiar goes wrong, you'll be up and running in a very short time.
In the meantime, gather these bits of hardware...
Taggle Corella LPWA transmitter
- Refer to the specifications for the Rev_A model (which we are using for this project).
- Connect a 2dBi ½ wave dipole antenna.
- Your transmitter MUST be within range of a Taggle LPWAN BaseStation to send data, but it can be offline while we set everything up initially.
Corella Shield
- This connects the Corella to the Arduino, with XBee standard connections.
The shield also allows the 3.3V Corella to connect to the 5V Arduino pins.
Arduino
- I'm using an Arduino Leonardo
from Jaycar
The reason I'm using a Leonardo is that it has 2 Serial Ports (One USB, one UART, with more supported via SoftwareSerial library) so that I can watch what's happening. - You can use a UNO or other Arduino with a single Serial port, but you'll need to remove the shield while developing your software, and put the shield back on to run it.
- The Arduino is powered by a +5.1V micro USB supply.
You'll need to plug the Arduino into any powered USB port on your computer while you program it, and then you can power it from batteries, or a 2.5Amp power supply.
Atmospheric Sensors
- I'm using a DHT11 Temperature and Humidity Sensor Module XC4520 from Jaycar
If your Corella came without header pins
- You can solder your components or jumper wires direct to the Corella.
- Or you can solder your own header pins, and continue...
Once your Corella has header pins
- You'll need
- Arduino Compatible Xbee Interface Shield XC4608 from Jaycar
- Arduino Compatible Mini Breadboard with 170 Tie Points PB8817 from Jaycar
- A set of 150mm Plug to Socket Jumper Leads WC6028 from Jaycar
Wiring up the Corella and Atmospheric Sensors
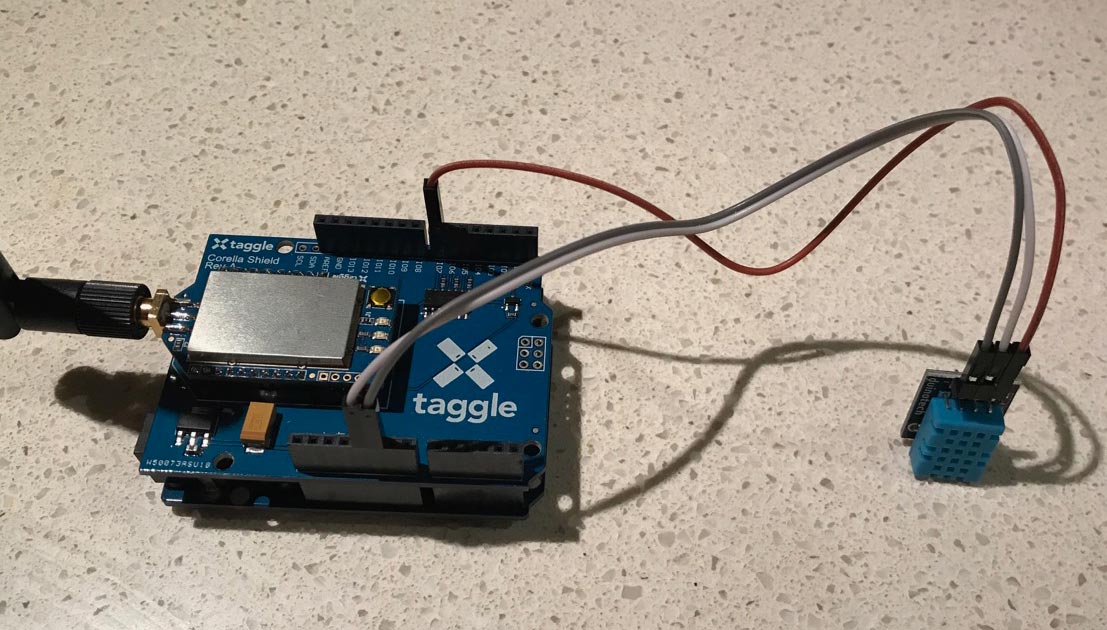 Connect the DHT11 sensor as shown.
◉ + connects to pin 5V
◉ - connects to pin GND
◉ S (data) connects to pin I07
Getting the Sensor software libraries
I discovered and used this excellent introduction to using the DHT11 on Arduino.
Before you can use the DHT11 on the Arduino, you’ll need to install the DHTLib library.
It has all the functions needed to get the humidity and temperature readings from the sensor.
It’s easy to install, just download the DHTLib.zip file below and open up the Arduino IDE.
Then go to Sketch>Include Library>Add .ZIP Library and select the DHTLib.zip file.
Installing the Corella sketches
These are a couple of variations a simple theme.
They are embarrasingly spartan, with not much in the way of error-trapping or diagnostics.
By the same token they get you started and you can always add whatever features you want or need.
The reason I chose to use a Leonardo is that it has 2 Serial Ports (One USB, one UART, with more supported via SoftwareSerial library) so that I can watch what's happening.
The flip side to this convenience is that once you disconnect from your PC, the IDE Serial won't work - if you've used it a lot in your code, you might need to comment those out (in case it hangs waiting for Serial connection to your PC).
You can use a UNO or other Arduino with a single Serial port, but you'll need to remove the shield while developing your software, and put the shield back on to run it.
Choose the Arduino model based on your own preferences.
Leonardo

/*
 * CorellaDHT11monitor.ino
 *
 * This sketch is for Arduino Leonardo, which has separate RX/TX for the IDE and for the shield
 * If you're using a UNO or similar, you should use the CorellaDHT11.ino
 *
 */

#include <dht.h>
dht DHT;
#define DHT11_PIN 7

unsigned long millis_between_messages = 11000; // A little over Ten seconds (absolute throttle)
unsigned long sensor_cycle_millis = 60000; // Ten minutes 10 * 60 * 1000

void setup(){
  // Initialize serial and wait for port to open: Serial refers to the USB connection with your IDE computer
  Serial.begin(9600);
  // Likewise, initialize TX/RX serial to the Corella shield (on pins 0/1)
  Serial1.begin(9600);
  while (!Serial1) {
    ; // wait for Corella to connect
  }
  if (Serial) {
    Serial.println("--Leonardo--");
  }
  Serial1.println("AT+SEND=1,--Leonardo--");
  delay(millis_between_messages);
}

void loop()
{
  int chk = DHT.read11(DHT11_PIN);
  if (Serial) {
    Serial.println("---------- READING DHT11 SENSOR ---------");
    Serial.print("Temperature = ");
    Serial.println(DHT.temperature);
    Serial.print("Humidity = ");
    Serial.println(DHT.humidity);
  }

  Serial1.print("AT+SEND=3,Humid:");
  Serial1.print(DHT.humidity);
  Serial1.println("%");
  delay(millis_between_messages);

  Serial1.print("AT+SEND=4,Temp:");
  Serial1.print(DHT.temperature);
  Serial1.println("C");
  delay(millis_between_messages);

  Serial1.print("AT+SEND=5,");
  Serial1.print(DHT.temperature);
  Serial1.print("/");
  Serial1.println(DHT.humidity);

  delay(sensor_cycle_millis);
}
UNO

/*
 * CorellaDHT11.ino
 *
 * This sketch is for Arduino UNO, which has only a single RX/TX
 *
 */

#include <dht.h>
dht DHT;
#define DHT11_PIN 7

unsigned long millis_between_messages = 11000; // A little over Ten seconds (absolute throttle)
unsigned long sensor_cycle_millis = 60000; // Ten minutes 10 * 60 * 1000

void setup(){
  // Initialize TX/RX serial to the Corella shield (on pins 0/1)
  Serial.begin(9600);
  while (!Serial) {
    ; // wait for Corella to connect
  }
  delay(millis_between_messages);
}

void loop()
{
  int chk = DHT.read11(DHT11_PIN);
  Serial.print("AT+SEND=3,Humid:");
  Serial.print(DHT.humidity);
  Serial.println("%");
  delay(millis_between_messages);

  Serial.print("AT+SEND=4,Temp:");
  Serial.print(DHT.temperature);
  Serial.println("C");
  delay(millis_between_messages);

  Serial.print("AT+SEND=5,");
  Serial.print(DHT.temperature);
  Serial.print("/");
  Serial1.println(DHT.humidity);

  delay(sensor_cycle_millis);
}
Upload the sketch to your Arduino, and hey presto, your Corella should start sending messages on a regular basis.
Power off ?
As with any Arduino software, it will start running again as soon as you plug into battery/power and it will start transmitting - no need to plug into your PC!
No local internet ?
No problems. The Corella broadcasts via LPWA radio to the Taggle network, not via the internet.
Now that it's all set up, you can disconnect from your PC.
As long as your Corella device is within range of a Taggle basestation, your data will be sent, and you can monitor it via the Corella Portal, or via MQTT with a dedicated /corella/ topic.
Viewing the MQTT data feed
Sign in to the Corella Data Portal.

The raw messages are seen in near-real time.
The packet_type and payload parameters can be seen in the JSON data.

Decoding and displaying your data
The data payloads that your Corella is sending are originally (in these examples) written as plain-text ASCII.
However, they are encoded to HEX for transmission.
The Corella Portal displays this raw HEX as the payoad (which technically it is), so it's up to you to decode the information
- which will be the "inverse" of how you encoded it in the first place.
Which means that the most obvious decoding, and the one we'll show you first, is hex-to-ascii.
A simple front-end decoder
Download and unpack the sample software from the Taggle Corella site
$ wget http://corella.taggle.com.au/rpi/custom_downloads/examples.tar.gz

$ tar xzvf examples.tar.gz
You will find you now have a folder called "frontend", containing 2 files
- corella_mqtt.js
- monitor.html
corella_mqtt.js is a simple javascript(+jQuery) library that allows you to easily
- Connect to the Corella MQTT broker via secure websockets
- Subscribe to a dedicated topic for your device
- Deal with realtime data as it arrives
- Convert HEX string to ASCII string (handy)
- Save the realtime message stream to your local browser so you can view timelines as well
- Switch on/off verbose diagnostics
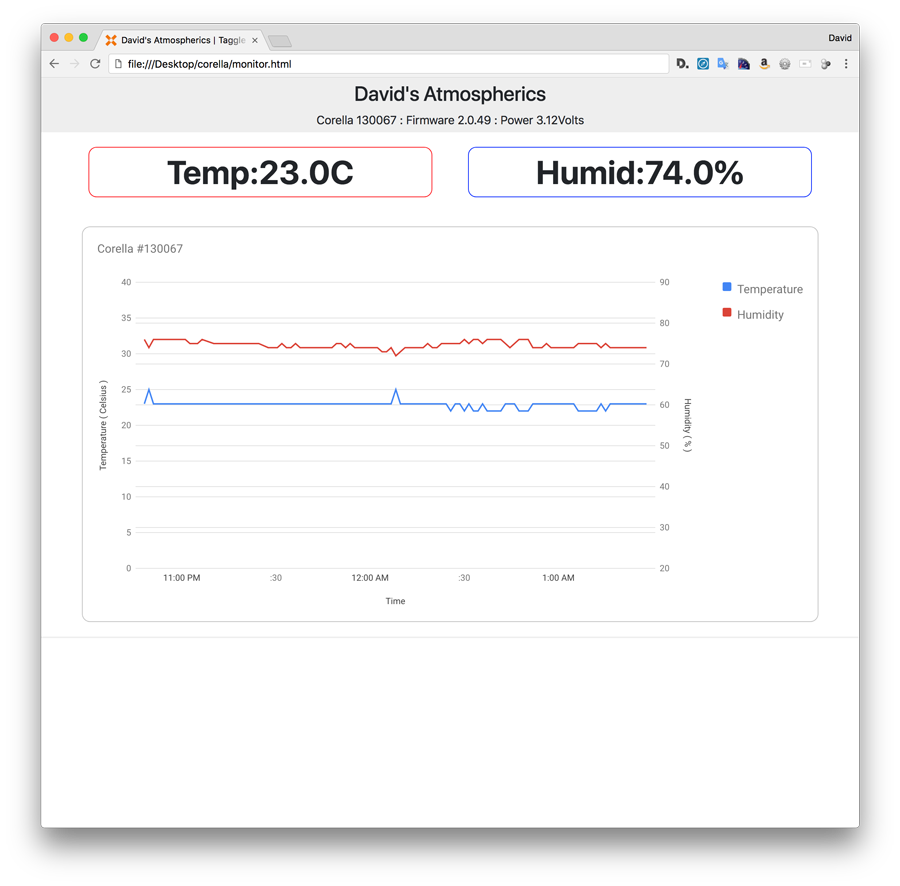
monitor.html is a standalone local HTML file that you can open in any browser.
It's specifically written to display the information that the DHT11.py script running on your RPi is sending.
It's also written to show you a few different ways to deal with the MQTT feeds - so you should play with it, make changes, and do magic.
- Create custom functions to deal with various network and data issues, based on simple examples
- Use the Google charts API for data visualization
You'll need to be connected to the internet,
but you don't need to run monitor.html from a webserver.
You'll definitely need a Corella Portal login
- where you will discover the configurations to make it run (for your device[s] only).
- Enter your connection details into the configuration
Actually, that's all you neeed do - to start with.
- Open monitor.html in your browser (drag it onto an open Chrome window for example)
Every time a new message comes in, the screen will update, and a graph will appear over time. - Use the browser's developer tools to watch the console and debugging logs.
Transmission credits
Your Corella device ships with credits for 10,000 transmissions on the Taggle IoT network.
After that, you'll need to pay to access more data -- so it's smart to do a few calculations before you leave it running.
The example code we've given you here is close to the practical limits (the Corella is throttled to transmit no more than every 10 seconds)
We're sending the same data in 3 different packets so you can see how to deal with it on the receiving end.
Which means you'll burn through your credits in 2 or 3 days.
A more practical setup would only send one packet of encoded/compressed data every 10 minutes.
Which means you'll have a lot longer - about 2 months.
But maybe that's not going to give you the immediate feedback while you're debugging and developing new projects.
You need to find the right balance for your project/budget.
If you devise a way to collate/encode/compress data, you could send a daily summary in a series of maybe 10 packets (that's about 240 Bytes).
Credits will last about 3 years.
Packet Types (a.k.a. Packet ID)
You specify a packet_type whenever you send data.
- The reserved packet_type [0] is reserved - used for diagnostic messages, and can be triggered at any time by pressing the TX test button, or controlling Corella pin 5 [RST] Active Low
- Analog packet_type [1] is interpreted by the Taggle Network as analog data
- User defined packet_types [2-9]
// ----------------------------------------------------------
// PHP Example
//   -- how to convert analog numbers to corella data packet, and decode the result
//   -- take note in this example of the rounding errors expected with IEEE-754
//      Single precision (32 bits)
//      https://en.wikipedia.org/wiki/IEEE_754
//      https://babbage.cs.qc.cuny.edu/IEEE-754/index.xhtml
// ----------------------------------------------------------

$raw_analog_data = array(
    12345678, // 0x3F9E060F
    -200.002, // 0xC3480083
    555.6666, // 0x4C94596E
);
print "\n raw_analog_data = ";
print_r($raw_analog_data);

$payload = analog_to_payload($raw_analog_data);
print "\n payload = ";
print_r($payload);

$data = payload_to_analog($payload);
print "\n data = ";
print_r($data);

// ----------------------------------------------------------

RETURNS :

raw_analog_data = Array
(
    [0] => 12345678
    [1] => -200.002
    [2] => 555.6666
)

payload = 4b3c614ec3480083440aeaaa

data = Array
(
    [0] => 12345678
    [1] => -200.00199890137
    [2] => 555.66662597656
)


// ----------------------------------------------------------
function analog_to_payload($data) {
    $payload = '';
    foreach($data as $num){
        $converted = '00000000';
        if( $num != 0 ){
            $sign = $num < 0 ? 0x300 : 0x200;
            $significant = abs($num);
            $exponent = floor(log($significant, 2));
            $significant = round($significant / pow(2, $exponent-23));
            $exponent += 127;
            $bin = substr(decbin($sign + $exponent), 1) . substr(decbin($significant), 1);
            if (strlen($bin) !== 32) { $converted = 'FFFFFFFF'; }
            $converted = str_pad(dechex(bindec($bin)), 8, "0", STR_PAD_LEFT);
        }
        $payload .= $converted;
    }
    return str_pad($payload, 24, '0');
}
// ----------------------------------------------------------
function payload_to_analog($payload) {
    $floats = array();
    foreach(array(0,8,16) as $k){
        $hx = substr($payload, $k, 8);
        if( $hx == '00000000' ){
            $floats[] = 0;
            continue;
        }
        $binx = sprintf( "%032b", hexdec($hx) );
        $sign = substr($binx, 0, 1);
        $exp = substr($binx, 1, 8);
        $mantissa = "1".substr($binx, 9);
        $mantissa = str_split($mantissa);
        $exp = bindec($exp)-127;
        $significand=0;
        for ($i = 0; $i < 24; $i++) {
            $significand += (1 / pow(2,$i))*$mantissa[$i];
        }
        $floats[] = $significand * pow(2,$exp) * ($sign*-2+1);
    }
    return $floats;
}
// ----------------------------------------------------------
// Javascript Example
//   -- how to decode a single 4-byte block of the packet (8 hex chars)
// ----------------------------------------------------------

var str = '41FC6733';

function parseFloat(str) {
  str = '0x' + str;
  var float = 0, sign, order, mantiss,exp,
      int = 0, multi = 1;
  if (/^0x/.exec(str)) {
    int = parseInt(str,16);
  }else{
    for (var i = str.length -1; i >=0; i -= 1) {
      if (str.charCodeAt(i)>255) {
        console.log('Wrong string parametr');
        return false;
      }
      int += str.charCodeAt(i) * multi;
      multi *= 256;
    }
  }
  sign = (int>>>31)?-1:1;
  exp = (int >>> 23 & 0xff) - 127;
  mantissa = ((int & 0x7fffff) + 0x800000).toString(2);
  for (i=0; i<mantissa.length; i+=1){
    float += parseInt(mantissa[i])? Math.pow(2,exp):0;
    exp--;
  }
  return float*sign;
}
Use the packet_type to differentiate between data types.
- (At the sensor end) craft a dedicated encoder script for this particular data type.
- (At the presentation end) craft a dedicated decoder script.
- Use the packet type at both ends so you can deal with other data types in parallel.
If you desperately need to deal with more than 9 data types, or you're using the packet_type for a large number of individual sensors, you could consider using the first byte of your payload to further divide them... or whatever other scheme you can think of. It's your data, so you can deal with it however you want. The Taggle network is agnostic and simply passes the payloads from end to end.
Downloads
| Assembly Drawings | Board Views | Schematic |
|---|---|---|

|

|

|
|
click to download PDF 209 KB |
click to download PDF 1.8 MB |
click to download PDF 139 KB |
About Taggle Systems
Taggle is an Australian based and owned developer of Low Power Wide Area (LPWA) radio technology offering low-cost, low-power, long range communications for many types of sensors and devices.
With a rapidly expanding international network, we service high-rise and urban centres, regional utilities, remote communities and farm monitoring. We work with our customers to deliver tailored solutions.
The Corella project enables experimentation, innovation, small-scale or specialized projects to be implemented without fuss or large investment.